Modernize Approval Management within Microsoft 365 with Approvals Center. Embrace efficiency, transparency, and control as you navigate the intricacies of approval workflows in a streamlined and contemporary manner.
  • Fully Functional Trial: Explore all the features with a no-credit-card-required trial.
  • Secure Data Storage: All your data is stored on your Microsoft 365 tenant.
  • Flexible Payment Models: Choose between an annual subscription or a lifetime license with a one-time fee.
  • Free Updates & Support: Stay up-to-date with the latest enhancements and receive free expert support.

Plans and Pricing


Approvals Center is sold in two billing models: Annual Subscription (paid once a year), the pricing works per group of users and Lifetime License for unlimited users (one-time fee). Click here to read more about billing & payments.
Annual Subscription
USD
210
/year

The above price reflects the total yearly expense for the app instance (NOT per user) and includes:
  • • App updates
  • • App support (No limit for support tickets)
  • • Access to all app features
Lifetime License
USD
2000
one-time fee
for unlimited users
The above price reflects the total expense for the app instance (NOT per year) and includes:
  • • App updates
  • • App support (No limit for support tickets)
  • • Access to all app features

Key Features

  • Request Templates - allows you to create different request forms (e.g. HR Request, IT Request, Expense Reimbursement Request, etc. )
  • Customizable approval form fields - build approval forms with numerous field types such as Text, Choice, Number, Currency, etc.
  • Role-based access control - allows you to set up the level of access that users have to the Approvals Center (regular user, manager, and admin)
  • Multi-level approval workflow - approval paths allow an administrator to easily set up multiple approvers.
  • Conditional approvals - approval conditions and thresholds allow you to determine which approvers receive an approval request.
  • Tracking object changes - each object in the app has an audit log which allows tracking of change history (e.g. creation, edition, approval, etc.).
  • Automatic email notifications - built-in email notifications to the requester and approver(s).
  • Substitute Approvers - if a Manager is out of the office, Manager or Admin can delegate approval permissions to other users.
  • Reporting and export to Excel - Approvals Centre provides several reports which can be used for management, billing and analytical purposes.
  • Attachments - allows you to upload additional files to the requests.
  • Integrated list - can be integrated with numerous other systems via Power Automate or used as a data source for Power BI (reporting services)
  • Custom branding - you can custom brand your logo and colors.
  • Translation-ready for other languages - allows language translation for regular user and manager views (except "Administration").

Integrations

Approvals Center contains a feature called "Integrations" that export data to the SharePoint list. Leveraging this SharePoint list unlocks the full potential of Microsoft 365's Power Platform. Employ Power Automate for automated workflows and seamless communication with external platforms. Utilize Power BI for in-depth data visualization and analysis. Click here for more information.

Why Us

3700
Customers worldwide
11
Years on the market
15
Apps in the Office Store
We are recognized by Microsoft as the winner of the prestigious "Office 365 App Award" (2015 edition) in the category of "Best User Interface."

Contact Us

Have questions or need assistance with our app? We're here to help! Reach out to our support team at or use the contact form to get in touch. We strive to provide prompt and friendly assistance to ensure you have a seamless experience with our app.

Product FAQ

After successful installation, the app is located on the SharePoint Site Contents.
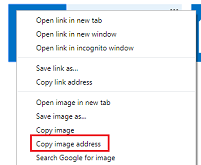
First, enter the app (first page) and copy the full URL from the browser's address bar into the clipboard (Ctlr+C).
The copied app URL will be useful in the following instructions.

Pin app to the SharePoint Site menu

Step 1) Go to the SharePoint Site
Step 2) Click "Edit" on left or top SharePoint menu and add link to the app
Details are described in this document, steps are different depends on the SharePoint UI type (classic view/modern view)
PinApp3

Pin app to MS Teams as a new tab

Step 1) Open MS Teams
Step 2) Click "+" icon to add a new tab
PinMSTeams1

Step 3) Type 'website' in the search box to find an item "Website"
PinMSTeams2

Step 4) Enter tab name, copy&paste above app URL (Method 1 or 2) and click Save button
PinMSTeams3


Pin app to the Office 365 app launcher

You can add custom tile to the app launcher under Office 365 Admin Center->Settings->Organization profile page.
PinApp4

Details are described in this document. To get logo URL required to create new tile on app launcher you can click right mouse button on app icon (SharePoint Site Contents) and select "Copy image address"
PinApp5

App is 100% SharePoint-hosted - all data is stored securely on the customer's SharePoint environment.
App's data is never leaving your SharePoint env, we don't have access to your data and we never see it.

You can download the fully functional trial version from the SharePoint Store, which is explained step by step in the above illustration.
If you have problems with app installation, please read the question "I cannot install SharePoint app on my SharePoint Site" from our Technical FAQ.

Add an app

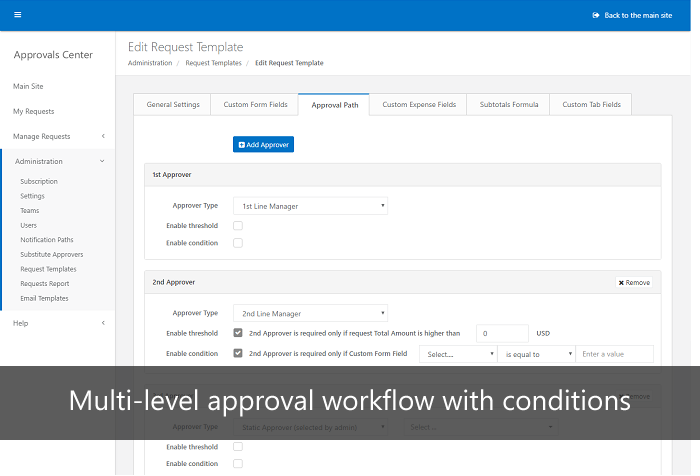
Approval workflow routes a request to one or more people for their approval or rejection.
Request workflow consists of the following states: Draft->Pending Approval->Approved or Rejected.
The approver(s) receives an email notification when a request is submitted.
The requester receives an email notification when a request is approved or rejected.


App offers three predefined user roles:

  • Regular user - can submit requests and see only own data
  • Manager - can see requests created from assigned templates under "Manage Requests" section
  • Administrator - can see all data under "Administration" section

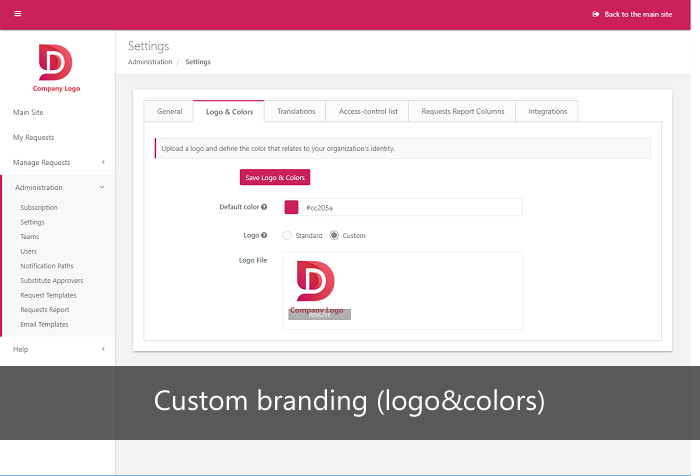
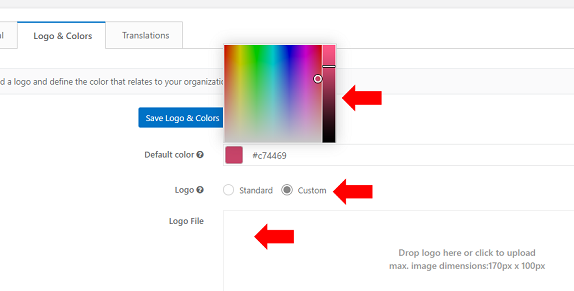
You can custom brand your logo and color under Administration->Settings->tab "Logo&Colors".
To upload own logo you need to:
a) switch setting "Logo" to the value "Custom"
b) click on area "Logo File" (or use drag&drop) to upload logo file.
c) click on button "Save Logo&Colors"

To change blue theme to another you need to click on color picker (setting "Default color"), select your color and click on the button "Save Logo&Colors".

Change theme

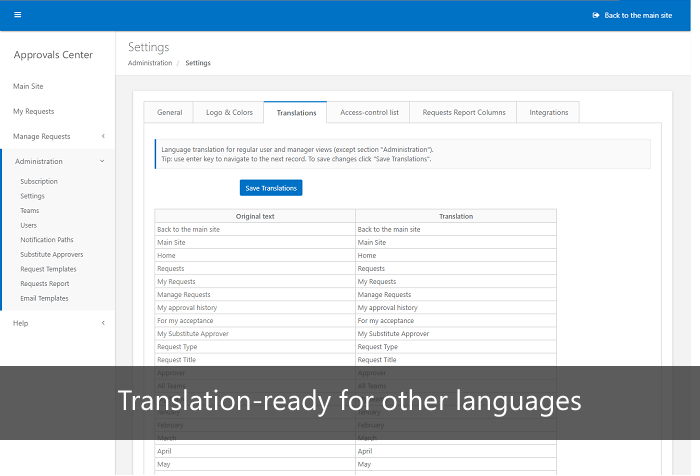
You can translate an app under Administration->Settings->tab "Translations".
Translations
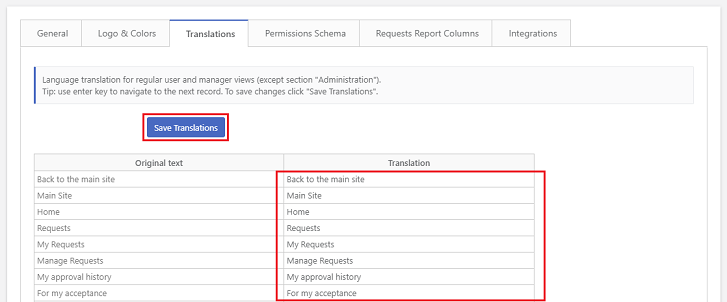
Language translation is available for regular user and manager views (except section "Administration").

To get more information about subscription and payments please read Billing & Payments FAQ

If you remove a user from the app, no data will be lost. The user will lose access to app, but their data will remain visible on all reports.

App update process is described here and also on our Technical FAQ, question "How to update SharePoint app?"

User list is pulled from SharePoint User Information List (built-in SharePoint feature, here is more info)
SharePoint user is added to the User Information List after first login to the SharePoint Site.
After first login, user will be visible in the user's drop-down list.

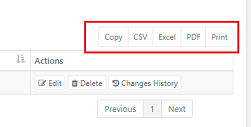
Table export is supported for all the objects in the app (columns displayed in data tables). To export or print data, click the proper button in the top-right corner, above the data table.
Table export

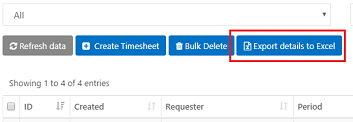
Additionally, objects with supported custom fields (time-off requests, timesheets and projects) allow full data export to MS Excel (all standard fields + custom fields.)
Full export

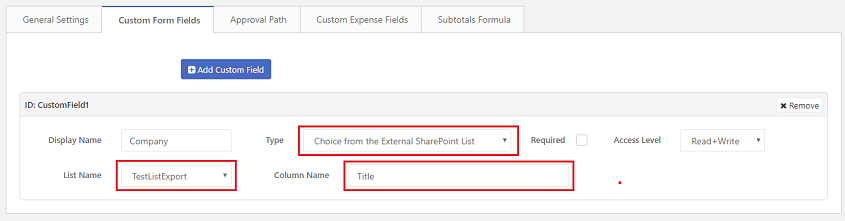
The app allows for creating custom fields for requests form. One of the custom field types is "Choice from External SharePoint List" which allows to dynamically populate the Choice Field options from the external SharePoint list on the parent SharePoint Site.
To configure this type of field, you need to change the "Type" field to the value "Choice from External SharePoint List", afterward select list name from the drop-down and enter column name from which app will get data.

External list

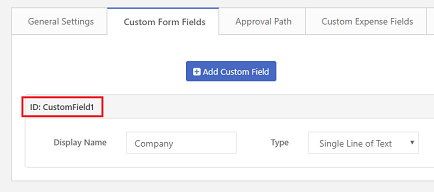
The app allows adding a custom form field to the administrator and manager reports that shows all requests.
Step 1) Go to Administration->Request Templates->Edit->tab "Custom Form Fields" to check what is "ID" of custom form field (e.g. CustomField1)
Custom column 1

Step 2) Go to Administration->Settings->tab "Requests Report Columns", click on empty row at the bottom of the data table and select custom field from the drop-down list. Make sure that the column "Is Visible" is marked.
Custom column 2

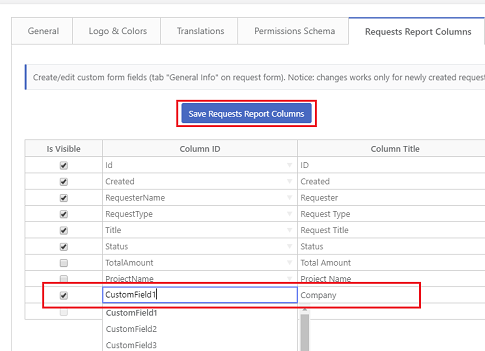
Step 3) Click button "Save Requests Report Columns" to save changes.